In this article, we are covering the installation of IntelliJ for Java development. IntelliJ IDEA is an integrated development environment written in Java for developing computer software. It is developed by JetBrains
This Articles Contents
Introduction to tools
All right so that’s now the housekeeping done. Let’s talk about installing the software we need for this course. So we’re going to be using JDK version 11 in this course. Now JDK stands for the Java Development Kit and it’s the software that is used to create and run Java programs. Now we’re also gonna be using IntelliJ IDEA and that’s much like a word processor but for creating programs.
Now on I’m one of the early adopters of IntelliJ. I started using it way back in the early 2000s and it’s a very powerful piece of software packed with lots of features for both beginners and pro developers, but the great thing about it is it’s extremely beginner-friendly as well and there’s a free community edition or paid ultimate edition. So either of these will work. You don’t need to spend any money for either of those tools actually and in the upcoming videos in this section of the course, I’m gonna show you how to get the Java Development Kit and IntelliJ IDEA working for Windows, Mac, and also for Linux. Now if you wanna use another IDE, Integrated Development Environment, Eclipse, or something of that nature, you’re welcome to do that. It’ll work fine. Other than that, let’s get started.
Java Development Kit Installation Overview
All right, so it’s time now to install the Java Development Kit. Now we’re going to be using an open-source version of a Java Development Kit, the Open JDK and that’s the creatable version we’re using is created by Amazon and they call it Amazon Corretto.
We’ll be using JDK version 11 in this course and not later versions. In a nutshell, version 11 is the LTS, or long-term support version of Java. Now if you’re wondering why we’re using Amazon Corretto and why we’re using JDK 11.
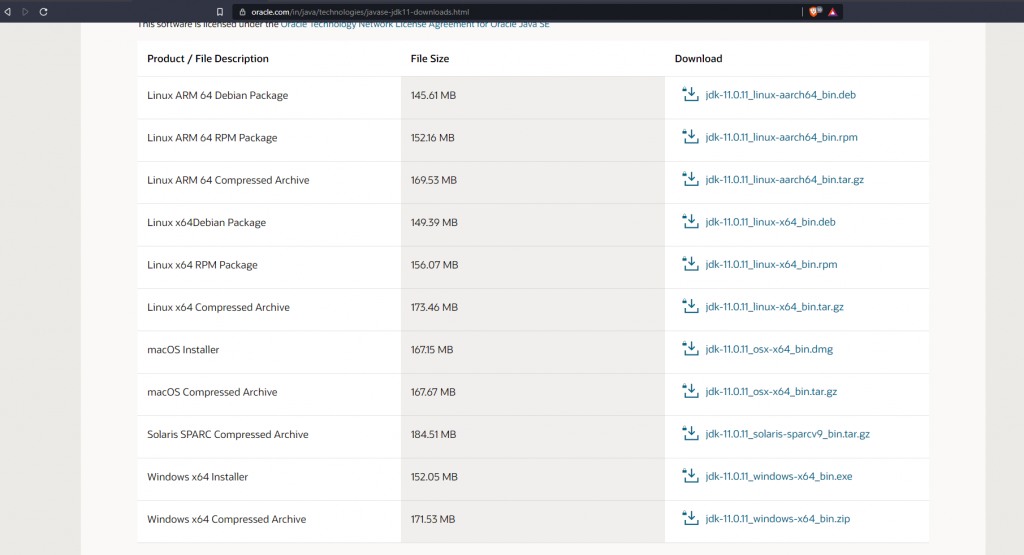

But getting back to this course though, there are Amazon Corretto articles, installation articles for the Java Development Kit, for Windows, Mac, and Linux in this section. And in addition, for IntelliJ, there’s also an article for the Windows platform, Mac, and Linux. So read the relevant article for your operating system and once you’ve done that, for both the JDK and IntelliJ IDEA, there’s then a single article for you to go through, irrespective of the operating system you’re running and that gives you some configuration, or an overview of the configuration steps you need to take within IntelliJ, to get it all working together. So make sure you check out that article after you’ve installed both the JDK and IntelliJ IDEA. All right so that’s it.
Let’s get stuck into it in the next part of the article. All right, so it’s time now to install the Java Development Kit. Now we’re going to be using an open-source version of a Java Development Kit, the Open JDK and that’s the creatable version we’re using is created by Amazon and they call it Amazon Corretto.
We’ll be using JDK version 11 in this course and not later versions. In a nutshell, version 11 is the LTS, or long-term support version of Java. Now if you’re wondering why we’re using Amazon Corretto and why we’re using JDK 11, I’ve also written some articles, check those out. They give you the reasoning why we’re using Amazon Corretto and why we’re using JDK version 11.
Installing IntelliJ Idea
For this series of articles, we’re going to use an IDE called IntelliJ IDEA. An IDE, or Integrated Development Environment, is the tool that we use to write programs. The main feature is a text editor, that we type our code into. But an IDE also compiles and runs our programs for us. And as you’ll see, it also warns us about errors in our code, before we run it. The IDE we’re going to use is called IntelliJ IDEA, created by a company called JetBrains.
There are other IDEs available, and you can use any that you want for this course. If you’ve already got an IDE that you like, and you’re comfortable using, then it’s fine to continue using it. Most modern IDEs provide the same, or very similar, features. If you haven’t used an IDE before, I suggest you use IntelliJ IDEA. That way your environment will work the same way as you’ll see in the videos. In this course, you’re going to download the latest version from the JetBrains website, so I’m going to go to jetbrains.com.
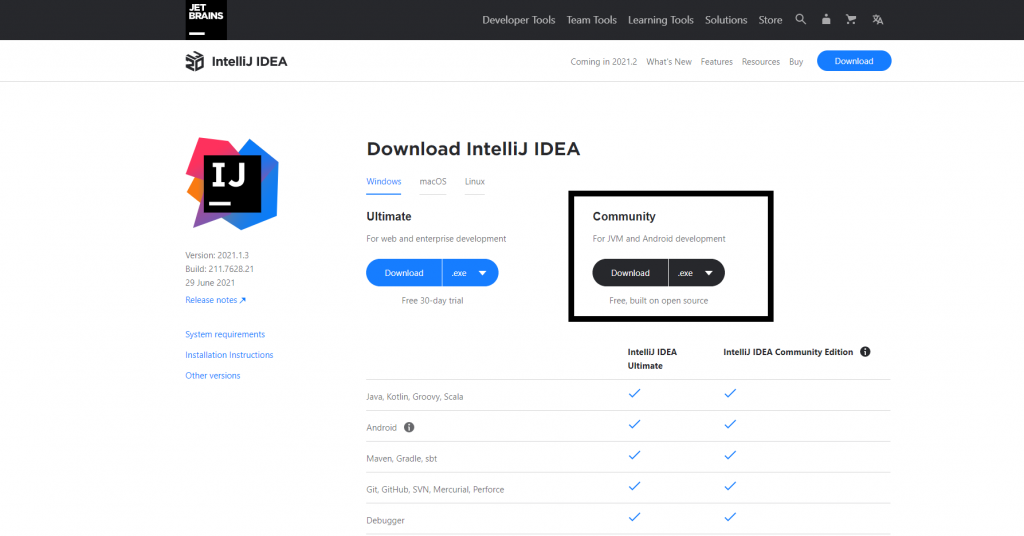

Come over here to Tools. You can see they’ve got a variety of products. The one we want is IntelliJ IDEA. click on that. I’m going to close this little popup if it appears for you. Click on download. So you can see over here to the right, there’s a Community Edition. That’s the one we’re going to download. The Community Edition is free, so I’m going to click on download. The Ultimate Edition has some extra features, but you’ll have to pay for it. You won’t need those extra features for this course. So we’ll leave it to download, and you can see it downloading, in the bottom left-hand corner of the screen.
OK, I’m going to open the file, now that’s been downloaded. We’re going to close down the browser. We no longer need that. We’re going to select Yes to this option, Do want to allow this app to make changes to your device. We’re going to click on next. I’m going to leave the destination folder unchanged, and click on next. On the screen for the installation options, you need to know whether you’re running a 64 bit or 32-bit version of Windows. I showed you how to check that, earlier in the course.
As a recap, come down here. You can either type 32 or type about, To get to you about your PC page. Either will get you there. And scrolling down here to system type. If it says 64-bit operating system, as mine does, then you have a 64-bit version of Windows. Otherwise, you’re running a 32-bit version. And this will be important as we swing back, to our installer screen. So make a note of which version you’re running. And also ignore the x64-based processor. It’s the operating system that we’re interested in here. So closing it down. So back in the installer, tick the appropriate launcher for your system, in the create desktop shortcut section. You want a 32-bit launcher on a 32-bit version of Windows, and a 64-bit launcher on a 64-bit version of Windows. I’m going to click the 64-bit launcher, because my Windows was 64 bit, as we saw. But make sure you click the right one for your system.


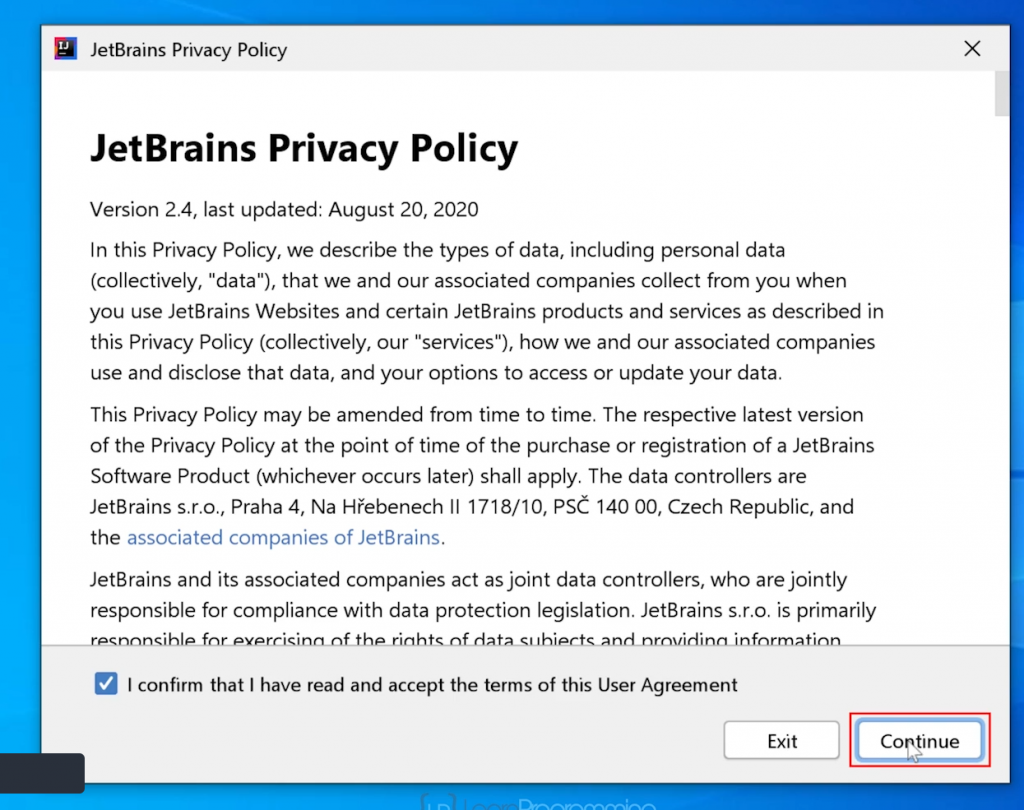
Additionally, and only 32 bit Systems, check the Download and install 32-bit JetBrains runtime box. I don’t need to do that, because I’m running a 64-bit version. Leave everything else un-ticked. The other options are more for convenience and aren’t essential. Click on Next, then click on Install. IntelliJ will now install, which will take a few moments. All right, so once it’s installed, tick the box to Run IntelliJ IDEA Community Edition, and click finish. You may or may not see this pop-up. If you do see it, this is a standard privacy policy type agreement.


Confirm that you’ve read it, and obviously you want to read that at some point. Click on Continue. The screen may pop up as well. You can always change the behavior, you can see the link there, in settings, if you need to change it at a later time. I normally select Don’t send. Now, you may or may not be prompted also to import settings from your previous installation. I wasn’t prompted. But most students will be installing this for the first time. So make sure, if you are prompted for that, to select Do not import settings. And again, you saw that I wasn’t actually prompted there for that. At this point, we’re now at the welcome screen.
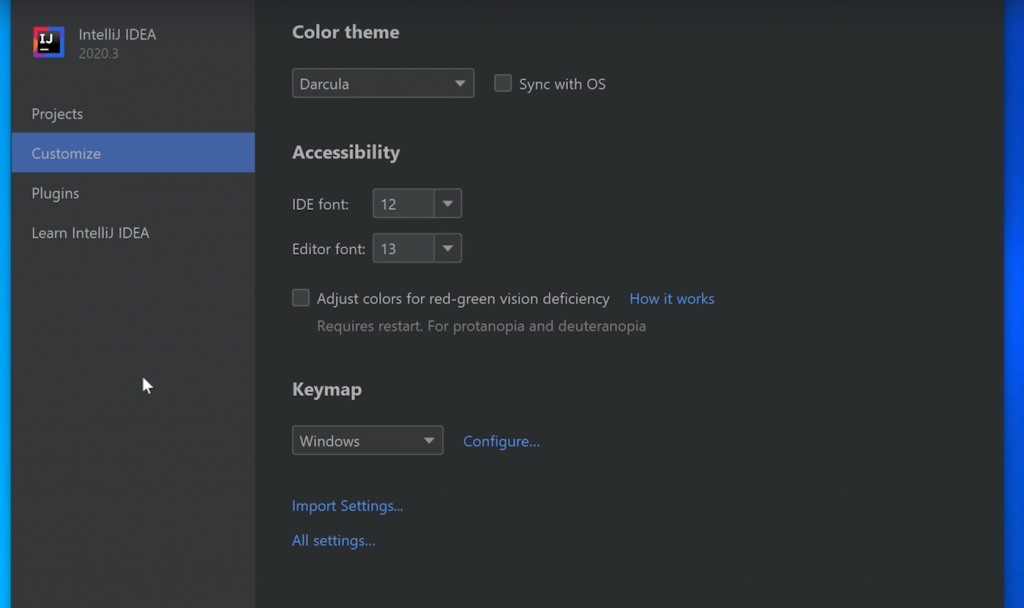

Now this new version, which was released at the beginning of December 2020, has a different Welcome screen to the earlier versions of IntelliJ IDEA. Most of the time you’ll be working with Projects selected, and you can see that on the left-hand side. This is where you create new projects and open your existing ones. We’ll be creating our first project in the next section of the course, but we should configure a couple more things before we do that. The one thing you may not like is the dark background that IntelliJ uses. And that’s okay because you can change it. You can click on Customize, over here to the left, and we get some options that control the display. The default color theme has a dark background. JetBrains calls the theme Darcula.


Many programmers prefer that, and it’s now the default. But if you prefer a light background, click the dropdown and choose one of the lighter themes. Personally, I also prefer a dark background, but it doesn’t show up that well in the article, so I’m going to change mine to IntelliJ Light. If you’ve set your operating system to use a light or dark theme, you can check the Sync with OS box. That works on Windows and Mac, but doesn’t, unfortunately, work on Linux. If you want to change the font size that IntelliJ uses, you can do that from here, too. You can also adjust the colors for red and green colorblindness if that’s something you’d find useful. All right. So at this point, we’re now done. We’ve now successfully installed IntelliJ IDEA.

So now that you’ve done that, we have a few minor configurations that we need to finish. Specifically, what we need to do is configure it for the Software Development Kit, so that we can start creating programs in this course. But we’re going to do that in a separate article. We start making a few other changes, to configure IntelliJ IDEA. Now skip over the articles for the other operating systems.
Configuring IntelliJ IDEA
We want to configure the IntelliJ idea so that we can actually start some java coding this article is applicable whether you’re running on Windows, Mac, or Linux So firstly we need to associate the JDK we installed on amazon Corretto 11 with IntelliJ idea So that they work together. Basically, that means telling IntelliJ where the JDK is installed on the computer. The JDK is effectively a software development kit or SDK.


Whatever you call it, it contains the tools you need to write programs the java development kit includes the tools that enable the computer to understand your java code and to execute it. It also has a debugger and we’ll be seeing what that is and how to use it when we’ve written a program to debug Alright so at the moment when Projects is selected on the left which it is at the moment there are three buttons available. New Project is used to create a new project which is the one we’ll use shortly.
Open will let you open a project that you created earlier so that you can continue working with it. If you use a version control system such as git then the Get from VCS button will fetch a project from your version control system hence VCS. But don’t worry, if you don’t know what a VCS is. You won’t use one until you’ve been programming for a while Let’s start by clicking on the New Project button.
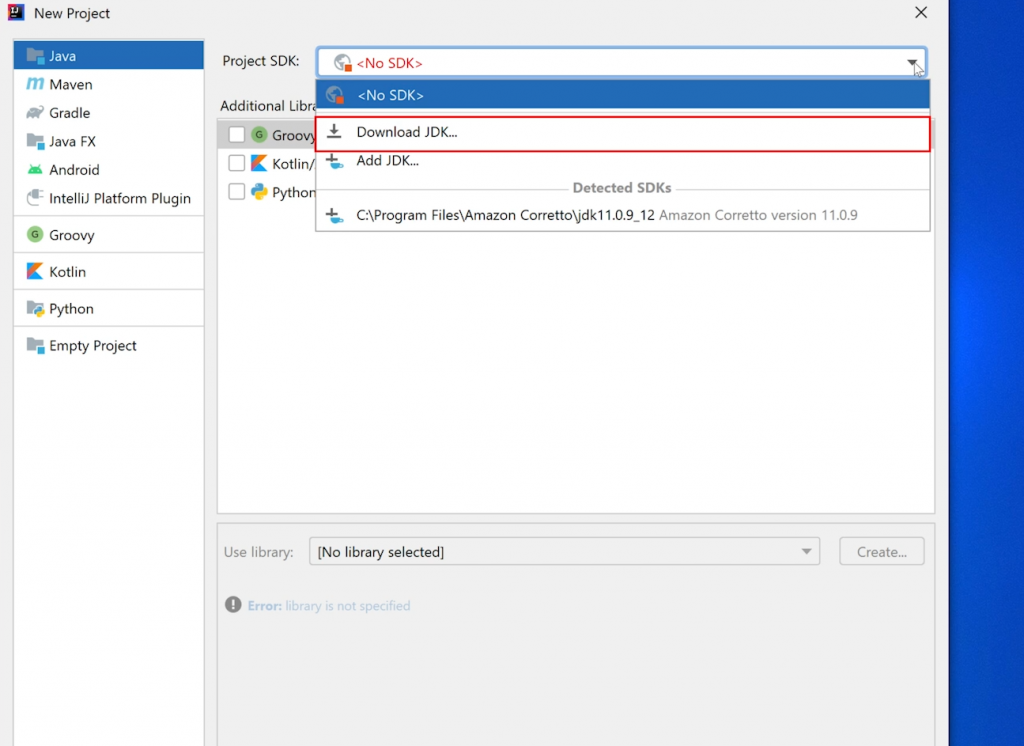

This lets you choose which programming language you want to use. This is a java course so I’m going to choose java on the left-hand side which should be the default selection and you can see that it is for me. So notice on the right-hand side it says no SDK it’s basically telling us that we don’t have one configured yet Now if we come over here and click on the drop-down button. there is an option to download a JDK but we don’t want to do that because we’ve already done that in an earlier part of this article.
Intellij will most likely detect the JDK you installed earlier and show it here but you can see it’s showing it on the screen there under detected SDKs. So you could click on that, but I’m just going to click on the option to add JDK, which you do if that didn’t show up. So from here, I can just go to Program Files and go to Amazon Corretto into the JDK and that’s what we downloaded in the earlier part of this article. If I do that then click on OK, you can see at the top their project SDK has now changed to Corretto 11, Amazon Corretto version 11.0.9 which is the latest version as of the time that I’m writing this article.


So if the auto-detect option doesn’t work you’ve still got an option to select the SDK. Now, I had to go into the New Project option to create the SDK because IntelliJ’s new version of this IDE as of December 2020 no longer had the option to do this from the welcome screen which is how we used to do it in the past. Now as it turns out, we’re not going to create a new project just yet, so what I’m going to do in fact is Cancel to get out of that. We’re going to do some other configuration now before we get started in the next article on actually creating our first project. So what we want to do is now come over here and click on Customize and come down here to All settings.
Then from here, we want to come down and click on Editor and click on General, I’m expanding the options as you can see there. I’m going to select auto-import highly recommended to check both Add unambiguous imports on the fly and Optimize imports on the fly. Click on apply then we’re going to go down to Code Folding. I’m going to uncheck a few things here and the reason we’re unchecking some things here is IntelliJ Idea is a professional editor meant to shortcut and make things easier for both beginners but also experienced developers. With some of these default options, it effectively hides some of the source code and when you’re first learning java it’s not a good idea to not see all the code.


So I’m going to come down here I’m going to deselect Imports. I’m going to deselect Online Methods we’re going to deselect Closures, this one here and also Generic constructor and method parameters So in other words I’m telling IntelliJ to show as much code as possible for those things and you can always come back here later in the course if you need to and change that back but it’s probably pretty useful for you to leave on. I click on apply. Alright, one other thing we need to do now is under appearance here we need to make sure that Show line numbers are checked.
In earlier versions of IntelliJ, sometimes that wasn’t checked but you can see that it is checked by default but if it’s not checked for you, make sure you check it and click OK. Okay, then we can go back and check projects again. So notice that these three buttons may have moved to the top of the right pane The main part of this page will show you a list of all the projects you’ve created which will make it much easier to open them again. But don’t get too hung up on the position of these three buttons that’s the New Project, Open, and Get from VCS. Jetbrains move things around from time to time and you’ll see that they’re in a slightly different place in some of the videos in this course. Ultimately that doesn’t matter when you see me click the new project button you’ll know where to find it on your screen. As I say it might be in a different place in the videos. Alright, so we’re all set up now and ready to program.
FAQ
So What is your understanding, Which IDE you are using ?.
What is IntelliJ used for?
IntelliJ is cutting edge IDE used for various software development, include Java, python, .net, JS
Is IntelliJ only for Java?
No, It is also present for others also, like python, JS click here for more info
Is IntelliJ idea free?
It comes under both free as a community edition and paid as the ultimate edition
Is IntelliJ for Java or JavaScript?
Available for both Java and JavaScript

