In this article, we’re going to cover the structure of Maven. By structure, we’re referring to the folder and file structure, as well as the location of files and ultimately how code gets compiled and packaged, all the various aspects regarding the structure inside of Maven. We’re also going to discuss the POM file and where these elements get pulled from. Let’s look a little deeper at our outline now. We’re going to look specifically at folder structure. We’re also going to take a look at the POM file basics like where our POM file is located and what some of the most common elements we use are inside the POM file. We’re also going to look at some of the basic commands and goals and how to add a dependency and what that looks like inside of our POM file. Then we’re going to take a look at where our local repository is located and how these items are stored and what the naming convention does to store those downloads into our local repository. Let’s start off by looking at the folder structure.
This Articles Contents
Folder Structure in maven
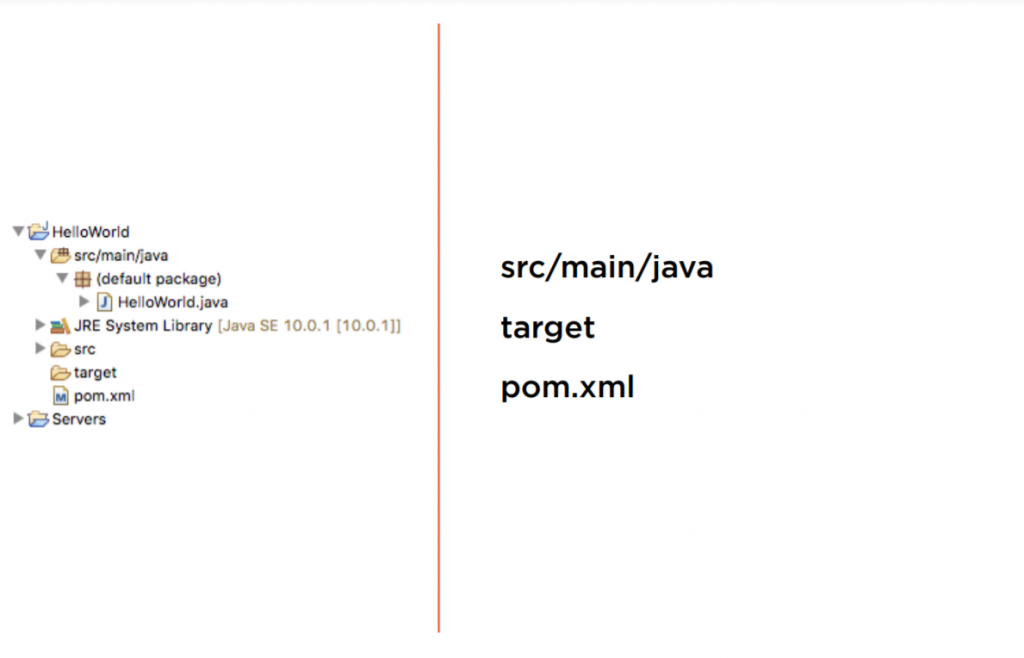
By default, Maven looks for a src/main/java directory underneath our project. It compiles all of our code to a target directory, and then it does all this by referencing our defaults and whatever things we’ve overridden in our pom.xml file. If you look at the image of our Hello World application on the left that we did in our earlier module, you can see this basic folder structure in place right now. Our project name was HelloWorld, subsequently, that’s also our artifactId. We’re going to talk about that more in a minute. We can also see the src/main/java directory where our HelloWorld.java file is located at, the target directory and our POM file as well. Notice the level at which these are too, src, target, and pom file are all at the top level of our application.
src/main/java
Our src/main/java directory is where we store all of our Java code. It’s also the beginning of our package declaration. If you’ve done much with Java, or C# as well, you’ll know that we have a package declaration at the top of our application. This is the start of our source code directory. In our previous example, we were just using the default package, so it stores it right underneath src/main/java. But, if we use a package, which you ultimately should, it would build that folder structure underneath this directory. What about other languages? Say we’re using Groovy or Scala or Kotlin, or another tool like that, or that we’re generating some web services?
We can actually set it up to use the src/main/groovy or src/main/resources folder, or other folder structures underneath that. When we talk more about plugins in a later module, you’ll learn that this is how we keep that code separate or how we use those different plugins to access the different types of source code that we’re dealing with. What about testing? You actually set up a src/test/java directory. You want to do this for two reasons. You can keep test code separate from production code, but we can have them reference the same package structure. We’ll show an example of how this is done down the road, but suffice it to say, you put all of your test code under src/test/java and all of your source code under src/main/java. One thing that’s worth mentioning is that src/test/java directory is specifically for unit tests and not necessarily for things like integration tests or other types of testing, black box, white box, etc. It’s an automated test, but specifically just for unit tests.
target
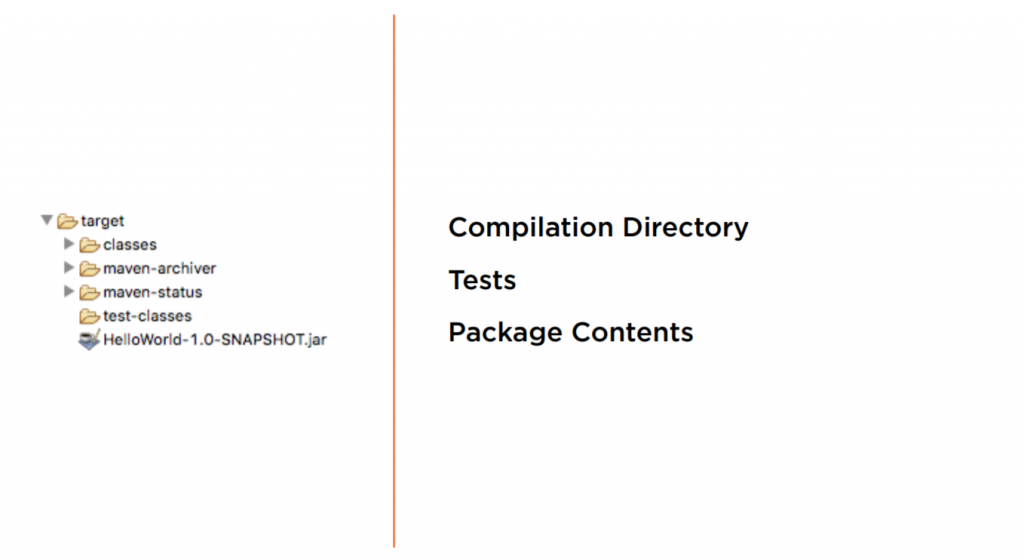
The target directory is where everything gets compiled to. It’s also where all of your tests get ran from. So when you run a go like package, it’s also where we bundle up all of our code and our tests and run them from the same structure, so it’s contents from which your directory get packaged into a jar and war. To create this image on the left, I went ahead on our Hello World application and ran a maven package, and this is what gets dumped out. Now you can see that we have our classes directory, just our standard source main Java, the maven archiver directory, and that’s what we’re referring to for our packages, and then a Surefire and test classes directory, and that’s how our code gets unit tested. You can also see that the artifact that gets dumped out there is the HelloWorld.1.0SNAPSHOT. Let’s now look at how this ties into your POM file and syncs all these directories together.
Goals
This is the basic POM file of our HelloWorld application that we just referenced while discussing our source and target directories to show you the defaults. There are a lot of things being assumed here. Remember that conversation around convention over configuration. We’re going to pick this apart some and show you what those defaults are, and right now, it doesn’t say anything about our package structure, it doesn’t say anything about our directory structure, and that’s because we are assuming all of those defaults that are associated with our POM. Now our POM file can actually be divided into four basic parts. We have our project information.
This is really the meat of what we’re looking at for our application. There’s things outside of the project, but really everything we’re concerned about is contained within these project elements. Let’s start with our groupId. The groupId is often the same as our package, and that’s what’s inside of our application. Packages like com.acme or com.onurdesk, such as our example here, are commonly what you would use for your groupId. They designate your business name or your application name as you would reference it as a web address. Our artifactId is the same thing as these name of our application. They’re synonymous with one another. So our application was Hello, capital H, World, capital W, and that’s what our artifact will be named.
<?xml version="1.0" encoding="UTF-8"?>
<project xmlns="http://maven.apache.org/POM/4.0.0" xmlns:xsi="http://www.w3.org/2001/XMLSchema-instance" xsi:schemaLocation="http://maven.apache.org/POM/4.0.0  http://maven.apache.org/maven-v4_0_0.xsd">
   <groupId>com.onurdesk</groupId>
   <artifactId>HelloWorld</artifactId>
   <version>1.0-SNAPSHOT</version>
   <modelVersion>4.0.0</modelVersion>
   <packaging>jar</packaging>
</project>
It should also be the same as what our element being produced will be named, and how it’s going to be released. The next thing we care about is our version. The version is very simply what we want to call it. So 1.0, 2.0, 3.0, or if it’s a maintenance release, something like 1.0.1, We’re going to dive into the difference between snapshots versus releases later in this course, but it’s just what we want to name our application, and they’re usually sequential in nature. The last part of our project is the packaging. Packaging is how we want to distribute our application. Is it a JAR, is it a WAR, a RAR, or an EAR file? These are just some of the common file types associated with Java applications. We could use the default packaging, which is a jar, and not specify it inside of our application, but I’ve gone ahead and hard coded it in here so that you can see that it’s specifically using a packaging type of JAR. Let’s talk about our dependencies next.
<?xml version="1.0" encoding="UTF-8"?>
<project xmlns="http://maven.apache.org/POM/4.0.0" xmlns:xsi="http://www.w3.org/2001/XMLSchema-instance" xsi:schemaLocation="http://maven.apache.org/POM/4.0.0               http://maven.apache.org/maven-v4_0_0.xsd">
   <groupId>com.onurdesk</groupId>
   <artifactId>HelloWorld</artifactId>
   <version>1.0-SNAPSHOT</version>
   <modelVersion>4.0.0</modelVersion>
   <dependencies>
      <dependency>
         <groupId>org.apache.commons</groupId>
         <artifactId>commons-lang3</artifactId>
         <version>3.8.1</version>
      </dependency>
   </dependencies>
</project>
How to use Goals example
The entire next module is dedicated towards dependencies, but we can’t talk about our POM and not spend at least a minute or two walking through how dependencies work in the bigger picture of our POM. Dependencies are imported by their naming convention. This is often considered the most confusing part of Maven, because you have to know what their artifactId is, what their groupId is, and what version you want to use. The nice thing about this, though, is that it will pull transit dependencies in for us. Like I said, we’re going to go into this in greater detail in the next module, but adding a dependency to our POM is fairly simple. We just add it in the dependency section of our POM, and we just need to list what dependency that we want to use, and any transitive dependencies will automatically be pulled in for us, We need to know our three things, our groupId, our artifactId, and our version. Let’s look what this code looks like for us to achieve this.
The pom.xml that we just looked at a minute ago now has a dependency section in it and a dependency listed inside of that. You can see that we’re pulling in the org.apache.commons groupId and the commons‑lang version 3, and specifically a specified version of 3.8.1. It’s pretty straightforward, and you don’t see that there’s transitive dependencies on the commons‑lang module, so it will just download this file and any supporting libraries that it needs. This is all you have to do to add a dependency inside of our section, but notice it’s the same naming convention of our project that it is for our dependencies: groupId, artifactId, and version.
How to package our application
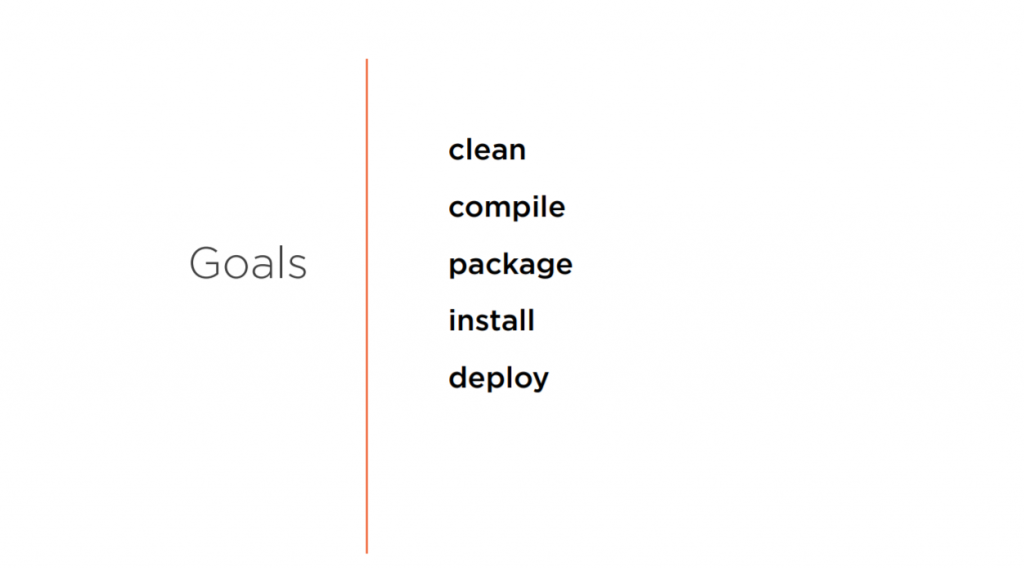
The goals that we can run off of our basic application are pretty straight forward. They’re much what you would expect to have from just basic functionality, and since we’re using a lot of the defaults, they’re already defined for us. We have a clean goal. The clean goal deletes the target directory and any of its generated sources. We have a compile goal. Compile is exactly what you think it’s going to be, we’re going to compile all of the source code. We’re also going to generate any files if we’re using a library such as web services or something like that, that would generate stubs and skeletons or other source code, and it will place that into our classes directory. If you have a .properties file or things like that, they’re going to get copied over into our classes directory underneath our target, as well.
We also have a package command. The package command will run compile first, so we don’t have to tell it to run compile, but we can daisy chain goals. It will run any unit tests that we have and package that up based off the type that we have defined inside of our POM. The install goal is a little bit different than what some people think. Install will run the package command, and then it will install it in your local repository. It will copy your JAR or WAR file, or however it’s packaged, and place it inside of your repository. The default of that is your home directory .m2. Now deploy is a little bit confusing to people. Deploy does not mean deploy it to an app server. Deploy runs the install command and then deploys it to a corporate or remote repository. If you’re using a corporate internal repository, deploy is going to copy it up to that internal repository. Now that can be as simple as a file share somewhere or something else, but install and deploy often get confused and backwards. As far as you’re concerned, install will install it locally, deploy will install it remotely.
How to use package Goals
Now that we’ve seen some of the goals that we can add to our application, let’s go ahead and change a few things inside of our project. First, I’m going to go ahead and right click on our project, and go down to Configure, and Convert this to a Maven Project. It will download a few things for a second, and set up the structure of our project very similar to what we had before, but showing it in a different view, and I’ll explain what I mean here in just a second. I’m going to open up my pom.xml, and you’ll notice that we don’t have a dependency section in here yet. So I’m going to go ahead and give me a little white space between packaging and the build section that we added, and add dependencies. Now one of the reasons I wanted to convert this to a Maven project is it gets smarter with these suggestions that we add in here.
So I’m going to add our dependency section, and then I’m going to add a dependency, singular, inside that section. And we start off with the three things that we always need, a groupId, and for our groupId, we want to do org.apache.commons, And then for our artifactId, we want to add in here commons lang3. Now, some people get hung up on why there is a number in this particular dependency, and it’s because they have different versions of this code base, and then they have releases of that code base. So this is specifically for lang3. Now the next thing we’re going to add in here and the last thing is our version, and we’re looking for 3.8.1. Now when I click Save, you’re going to see a couple things maybe flash on the screen.
What happens is it will go through, and it’s building my workspace and downloading some dependencies, and I’m going to show you over here on our left‑hand side, we now have a Maven Dependencies source folder over here, and we have commons‑lang3 added to our class path. So let’s automatically pull that down and set it up to build our application based off that class path. Let’s look and see what this does for our goals off in the command line. I’ve gone ahead and gone to the route of our application, C:\dev\workspace\HelloWorld, and I’m going to type in here maven clean. We ran this once before, so it’s not going to go ahead and download a bunch of dependencies like it did before the first time we ran it.
We’ll do maven compile, and this will compile our source code, and we actually haven’t changed our source code, we just added things to our class path. We could go utilize the Commons library to do something inside of our source code, but you get the idea here. And then I’m going to run a new one for you, maven Install. Now before I click Enter here, I want to point out to you two things. It’s going to go ahead and download all the dependencies that it needs, package up the application, and then install it in our local repository. So when I click Enter here, you’ll see it download some dependencies, and we’ll go through and run any tests that we have inside of our application, and package it up, and then install it.
And if you look at the text, you can see that it says it’s installing C:\dev\workspace\HelloWorld\target\HelloWorld1.0.SNAPSHOT.jar to this location on my hard drive. So everything there in that info section, it can tell you it’s doing there. And if you look and compare that to what we had before, this is everything that we had specified for our project structure. We had our groupId of com.onurdesk, our artifact of HelloWorld, and our version 1.0SNAPSHOT, and that’s exactly where it installed it to our local repository, com.onurdesk\HelloWorld\1.0SNAPSHOT, and then the artifactId.
So you’re starting to see how it organizes these things in your local workspace. I want to go a step further though and pull up my M2 repository directory. So I’m going to move this out of the way, and I want to go to my user directory, so we’re going to go to C:\Users, Bryan,, and you’ll see this M2 directory. This is the Maven home. Inside of here, you’ll see repository, and you’ll see com, onurdesk, HelloWorld, our 1.0‑SNAPSHOT, and here is our artifact that it uploaded for us. So here’s everything from the beginning of us running that project to running install, it went through and built this folder structure based off of our groupId, artifactId, packaging type, and version. So we have all of our application ran through that configuration and installed based off those POM properties.
Defaults
Now that we’ve seen the basic defaults that Maven has to offer, the next question people always ask when learning Maven is great, how do I override those defaults? Inevitably, you have some legacy code or something stuck around that you have to conform Maven to build to that structure or get it to produce an artifact of a certain name. So how do you override those? The build section. As you may remember earlier, we mentioned that the build section is where we override things of a specific nature. I’m going to show a few examples from the build section, nothing super deep, but how to override some of those defaults. Then we’re going to go deeper on the build section in the Plugins module, which is a later module in this course. Let’s go ahead and change the final artifact name of our application that gets built now
Local Repo Structure
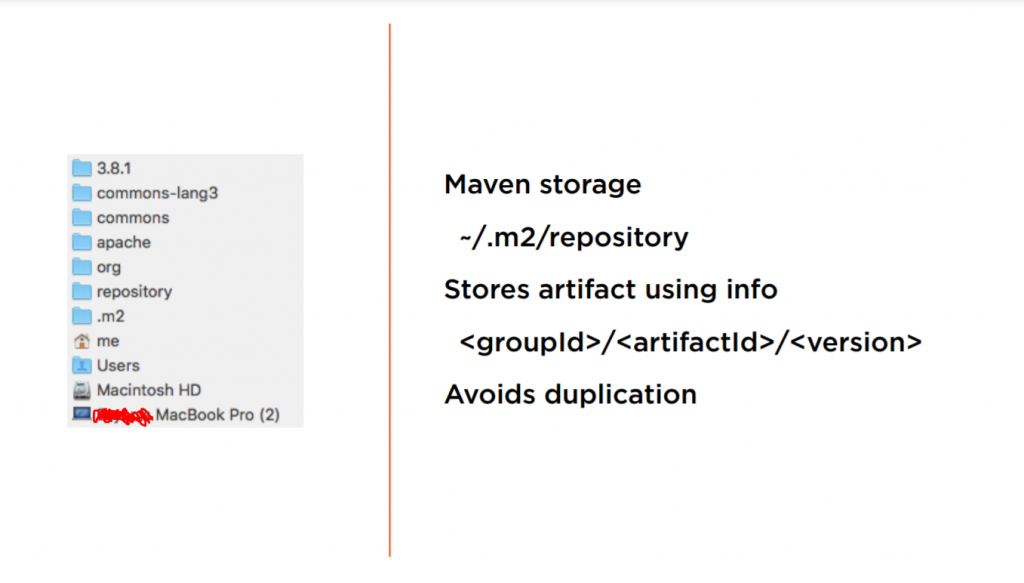
Once we’ve ran the compile command or any command that is preceded by the compile command, it will download all of your dependencies to your local storage. Our local storage is by default in our home directory under the hidden directory of .m2. The path is almost identical regardless of your operating system. I’m using a Mac for some of the articles in this demo and a Windows machine, and they’re both storing Maven artifacts underneath my .m2 directory. You can see in the image on the left that it has the path underneath my username, .m2, repository, org.apache.commons.commonslang3 3.8.1 folder structure. This is all it does to store artifacts using this info. Now, this is just a default.
You don’t have to have things stored underneath the .m2 directory, but 95% of people I see use Maven actually just leave it here. When you upgrade from Maven from time to time to a newer version, you’d have to go back in there and change the settings that it’s stored with. Now everything we’ve seen stores this based off of your groupId, artifactId, and version. I’ve repeated this multiple times now, honestly because I’m just trying to get it to stick. Everything goes with your groupId, your artifactId, and your version. As you recall from our demo a minute ago, it had our groupId for the folder structure, the artifactId for the subfolder, and then the version for a folder as well. On top of that, it uses all of those combined to make that artifact name that’s stored underneath our .m2 repository directory. This structure helps us avoid duplication.
We don’t need to copy these jars into every application we have. They can all be referenced from this location. We also don’t bloat our Git or Bitbucket or whatever SCM we’re using to store our application. There’s no reason to keep storing these jar files repetitively in there for each application, we can access them from one central repository.
The Build Section
To demonstrate how we can override the default naming convention of our application, I’m going to go ahead and open up our pom.xml file again, go into the build section, and I’m going to override the final name of our application to foo.jar. So if I save this file, come out to our command line, and run mvn package, it will go through and build our application, and the final artifact will be named foo.jar. And you can see that it already put that out in the output. But let’s go ahead and navigate into our target directory. When I go into target and do a DIR, you’ll see that we have foo.jar here. Just so we don’t leave that out there as foo.jar, let’s come in here and delete that line back out and run it again.
You’ve got to be up at your project not down in the target directory. And it’ll build our application, and it will build it with HelloWorld1.0 SNAPSHOT. Now I want to show you two things here. If I cd back into our target directory and do a DIR again, because I did not run clean, I have both foo.jar and HelloWorld1.0SNAPSHOT.jar both in my target directory. So if you’re making changes like that, you probably want to run an mvn clean and then an mvn package and have that delete that target directory and recreate your application. So now when we go back into the target, we’ll only have our HelloWorld1.0SNAPSHOT.jar.
Summary
In this module, we talked about where our source code goes. Everything gets stored under src/main/java. If we have a package structure, that’s the start of our package. We also looked at everything that gets compiled to our target directory. That’s also where, when we are packaging something, it makes our jar file or war file to go to that directory as well. We talked about the four major parts of the POM, and we introduced a few goals, a few basic goals to you, and we also looked at the capability of chaining goals where we ran maven, clean, package, clean compile.
We looked at a basic example of the dependency and pulled a new dependency into our application, the commons-lang dependency, specifically. Then we also looked at where things are stored in our local m2 repository repo. Lastly, we also looked at how you can override some of the default behaviors like the final build name. That’s always done inside your build section, where we specified specific plugins or how we want to override them, and we’ll go into more detail of dependencies in the next section, and we also have a plugins dependency module as well.