Welcome to the article, Core Python: Getting Started. To be useful and develop Python programs of the highest caliber, it’s crucial to have a solid understanding of the language’s fundamental ideas. We believe that success with Python depends on getting off to the correct start and avoiding common misconceptions early on. With this module, we hope to do just that.
Before beginning, you should be familiar with basic computer concepts, like files and running programs. Although no prior programming knowledge is required for this module, it can be beneficial to have a fundamental understanding of ideas like functions and program execution. Organizing Larger Programs, Classes and Object-Oriented Programming, Functions and Functional Programming, and Robust Resource and Error Handling are other Core Python language courses that you should feel comfortable pursuing after this. With the Core Python: Getting Started article hope you’ll embark on this adventure to learn more about the Python programming language.
This Articles Contents
Installing and Starting Python
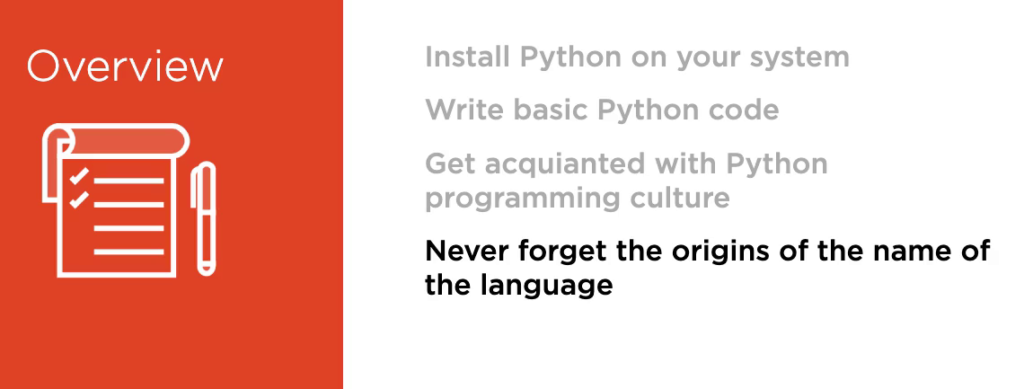
Overview: In this module, we’ll cover obtaining and installing Python on your system for Windows, Ubuntu Linux, and mac OS. We’ll write some basic Python code and become acquainted with the essentials of Python programming culture, such as the Zen of Python. Though we’ll never forget the origins of the name of the language. There are two major versions of the Python language, Python 2, which is the widely‑deployed legacy language, and Python 3, which is the present and future of the language. It’s now over a decade since the transition from Python 2 to Python 3 was begun, and we strongly recommend that all new projects are begun with Python 3 as Python 2 will not be maintained from the year 2020.
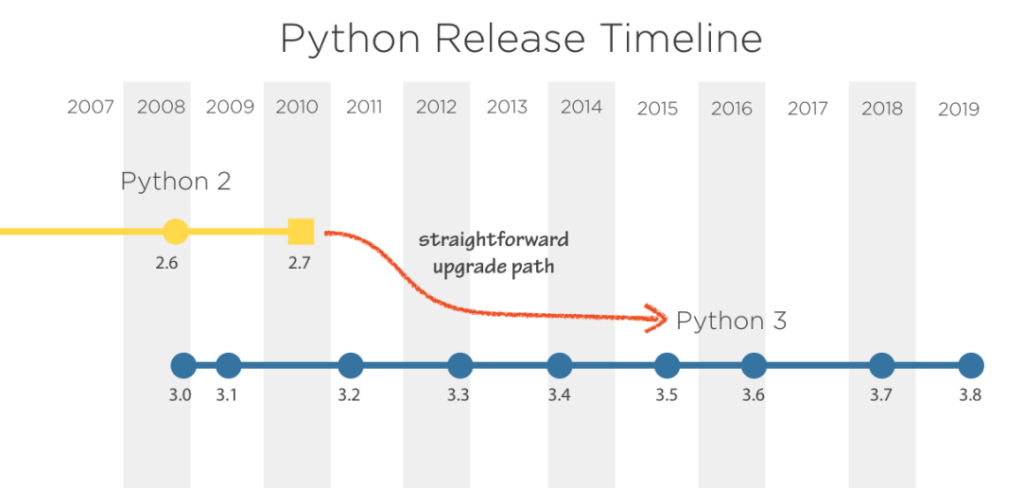
That said, most of the Python code we will demonstrate will work without modification between the last version of Python 2, which is Python 2.7, and recent versions of Python 3, such as Python 3.8. However, there are some key differences, and in a strict sense, the languages are incompatible. We’ll be using Python 3 for this module, and everything we show will work on Python 3.6 or later, and most things will work on Python 3.3 or later. We’re also confident that everything we present will apply to future versions of Python 3, so don’t be afraid to try those as they become available.
Installing Python:
Before we can start programming in Python, we need to get ahold of a Python environment. Python is a highly portable language available on all major operating systems. You will be able to complete this module on Windows, Mac, or Linux, and the only major section where we diverge into platform specifics is coming right up, as we install Python 3. Let’s see how to install Python 3 on Windows 10. For Windows, you need to visit the official Python website at python.org and then navigate via the Downloads tab to the downloads for Windows and click the button to begin downloading the latest Python 3 version. When given the option, choose to run the installer.

Before proceeding, make sure you select Install Now after the installer has begun and enable the choice to add Python to the PATH environment variable.
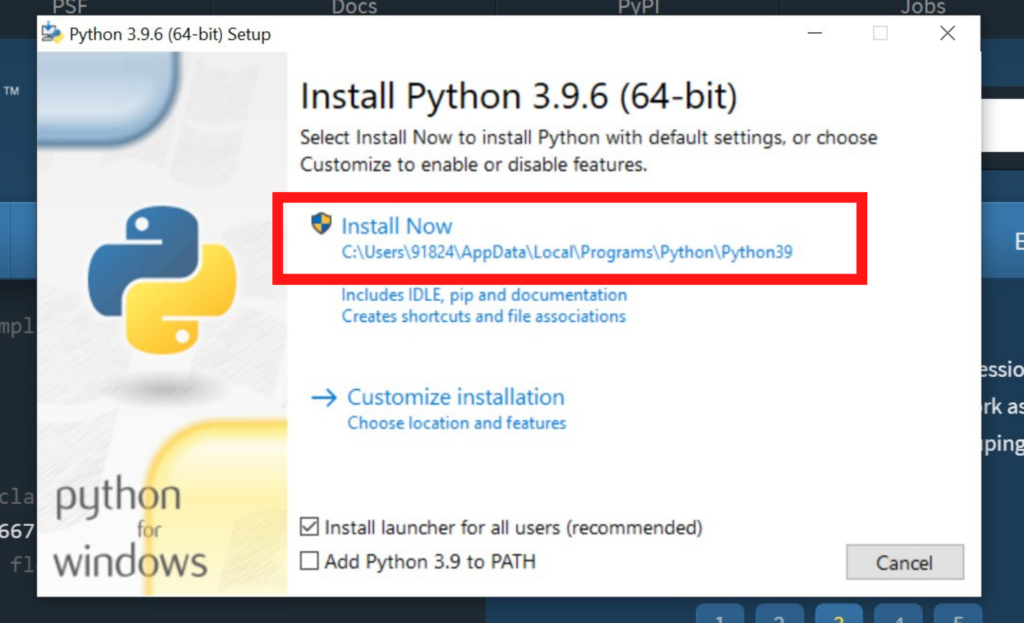
If the Python Installer requests your permission to make changes to your device, you should grant it. The installer will finish in a short while, at which point both the installer and your web browser can be closed. Select Windows Power Shell from the Start menu as we’ll be working with Python from the command line. If you’re using an older version of Windows, you might need to start Python by typing python, followed by Enter, in the Command shell.
When Python is installed, you can clean up by moving the installer to the trash. To use Python, open a terminal, and run Python 3 from the command line. Welcome to Python. The triple arrow prompt shows that Python is waiting for your input. The last operating system we’ll look at is Linux, which is the easiest of all. Recent versions of Ubuntu Linux include Python 3 out of the box, so no installation is required. To begin using Python, open a terminal.
Interactive Python:
Now that Python is installed and running, we can immediately start using it interactively. This is a good way to get to know the language, as well as a useful tool for experimentation and quick testing during normal development. This Python command‑line environment is a read, eval, print loop. Python will read whatever input we type in, evaluate it, print the result, and then loop back to the beginning. You’ll often hear it referred to as simply the REPL. When started, the REPL will print some information about the version of Python you’re running, and then it will give you a triple‑arrow prompt. This prompt tells you that Python is waiting for you to type something.
Within an interactive Python session, you can enter fragments of Python programs and see instant results. Let’s start with some simple arithmetic. As you can see, Python reads our input, evaluates it, prints the result, and loops around to do the same again. We can assign the variables in the REPL, print their contents simply by typing their name, and refer to them in expressions. Within the REPL, you could use the special underscore variable to refer to the most recently printed value, this being one of the very few obscure shortcuts in Python, or you can use the special underscore variable in an expression.


Remember though that this useful trick only works at the REPL. The underscore doesn’t have any special behavior in Python scripts or programs. Notice that not all statements have a return value. When we assigned 5 to x, there was no return value, only the side effect of bringing the variable x into being. Other statements have more visible side effects. Try typing print Hello, Python, at the prompt, you’ll need parentheses after the print and quotes around the text, then press enter. You’ll see that Python immediately evaluates and executes this command, printing the string Hello, Python and returning you to another prompt.
It’s important to understand that the response here is not the result of the expression being evaluated and displayed by the REPL. Rather, it is a side effect of the print function. As an aside, print is one of the biggest differences between Python 2 and Python 3. In Python 3, parentheses are required, whereas in Python 2, they are not. This is because in Python 3, print is a function call. More on functions later. At this point, we should show you how to exit the REPL and get back to your system shell prompt. We do this by sending the end of the file control character to Python.
Although, unfortunately, the means of sending this character varies across platforms. If you’re on Windows, press Ctrl+Z followed by Enter to exit. If you’re on Mac or Linux, press Ctrl+D to exit. If you regularly switch between platforms and you accidentally press Ctrl+Z on a UNIX‑like system, you will inadvertently suspend the Python interpreter and return to your operating system’s shell. To reactivate Python by making it a foreground process again, simply run the FG command and press Enter a couple of times to get the triple‑arrow Python prompt back.
Significant White space:
Now that you have a working Python REPL, let’s look at some basic code structures. Start your Python 3 interpreter using the Python or Python 3 command for Windows or Unix‑like systems, respectively. The control flow structures of Python, such as for loops, while loops, and if statements are all introduced by statements that are terminated by a colon, indicating that the body of the construct is to follow. For example, loops require a body, so if you enter for i in range 5, Python will change the prompt to 3 dots to request you provide the body.

One distinctive and sometimes controversial aspect of Python is that leading white space is syntactically significant. What this means is that Python uses indentation levels rather than the braces used by other languages to demarcate code blocks. By convention, contemporary Python code is indented by four spaces for each level, so we provide those four spaces and a statement to form the body of the loop. Our loop body will contain a second statement. So after pressing Return and getting another three dot prompt, we’ll enter another four spaces, followed by a call to the built‑in print function.
To terminate our block, we must enter a blank line into the REPL. With the block complete, Python executes the pending code, printing out the multiples of 10, and less than 50. Looking at a screen full of Python code, we can see how the indentation clearly matches and, in fact, must match the structure of the program. Even if we replace the code with Gray lines, the structure of the program is clear. Each statement terminated by a colon starts a new block and introduces an additional level of indentation, which continues until the de‑dent restores the indentation to a previous level. Each level of the indent is typically four spaces, although we’ll cover the rules in more detail in a moment.
Python’s approach to significant white space has three great advantages. First, it forces developers to use a single level of indentation in a code block. This is generally considered good practice in any language because it makes code much more readable. Second, code with significant white space doesn’t need to be cluttered with unnecessary braces, and you never need to have code standard debates about where the braces should go.
All code blocks in Python code are easily identifiable and everyone writes them the same way. Third, significant white space requires that a consistent interpretation must be given to the structure of the code by the author, the Python runtime system, and future maintainers who need to read the code.

As a result, you could never have code that contains a block from Python’s point of view, but which doesn’t look like it from a cursory human perspective. The rules for Python indentation can seem complex, but are straightforward in practice. The white space you use can be either tabs or spaces. The general consensus is that spaces are preferable to tabs, and four spaces has become a standard in the Python community. One essential rule is never to mix spaces and tabs. The Python interpreter will complain, and your colleagues will hunt you down.

If you choose, you may use various indentation levels at certain points. The fundamental criterion is that a code block is regarded to consist of any consecutive lines of code that are indented at the same level. There are a few exceptions to these guidelines, but they nearly always involve increasing code readability in other ways, such as by dividing logically lengthy statements over numerous lines. Programming as Guido meant it, or as indented, is demonstrated by this strict approach to formatting code. This attitude of giving important consideration to code attributes, such as readability, strikes at the very core of the Python community.
Python Culture:
Many programming languages are at the center of a cultural movement. They have their own communities, values, practices, and philosophy, and Python is no exception. The development of the Python language itself is managed through a series of documents called Python Enhancement Proposals, or PEPs. One of the PEPs, called PEP 8, explains how you should format your code, and we follow its guidelines throughout this article. It is PEP 8, which recommends we use 4 spaces for indentation in new Python code.
The Zen of Python is the name of one more of these PEPs, PEP 20. Only 19 of the 20 aphorisms that describe Python’s guiding ideas have been documented. Since it is always accessible from the REPL by typing import this, The Zen of Python is conveniently never farther away than the closest Python interpreter. In order to grasp how they relate to what we have learnt, we will be emphasising specific pearls of wisdom from Python’s Zen in Moments of Zen throughout this module.
This is a fantastic time for our first Moment of Zen because Python major indentation has just been added. Readable code is important code because readability counts and clarity matters. In time, you’ll come to appreciate Python’s significant whitespace for the elegance it brings to your code and the ease with which you can read other’s.

The Python Standard Library:
As mentioned earlier, Python comes with an extensive standard library, an aspect of Python often referred to as batteries included. The standard library is structured as modules, a topic we’ll discuss in depth later in this course. What’s important at this stage is to know that you gain access to standard library modules by using the import keyword. The basic form of importing a module is simply the import keyword followed by a space and the name of the module. For example, let’s see how we can use the standard libraries math module to compute square roots. At the Triple Arrow prompt, we type import math.

Python doesn’t say anything if an import succeeds and the user is immediately taken back to the prompt since import is a statement that doesn’t produce a value. By using the module name, a dot, and the name of the required attribute from the imported module, we may access the contents of the module. The dot operator is used to delve deeper into object structures, just like in many other object-oriented languages. We know the math module has a function named SQRT since we are seasoned Pythonistas. Let’s give it a shot.
But how can we find out what other functions are available in the math module? The REPL has a special function, help, which can retrieve any embedded documentation from objects for which it has been provided, such a standard library modules. To get help, simply type help. We’ll leave you to explore the first form for interactive help on your own time. We’ll go for the second option and pass the math module as the object for which we want help. You can use the Space bar to page through the help. If you’re on Mac or Linux, use the arrow keys to scroll up and down.
Browsing through the functions, we can see that there is a math function for computing factorials. Press Q to exit the help browser and return us to the Python REPL. Practice using help to request specific help on the factorial function, press Q to return to the REPL. Let’s use the factorial function, which accepts an integer and returns an integer. Notice how we need to qualify the function name with the name of the module containing it. This is generally good practice as it makes it abundantly clear where the function is coming from. That said, it can result in code that is excessively verbose.
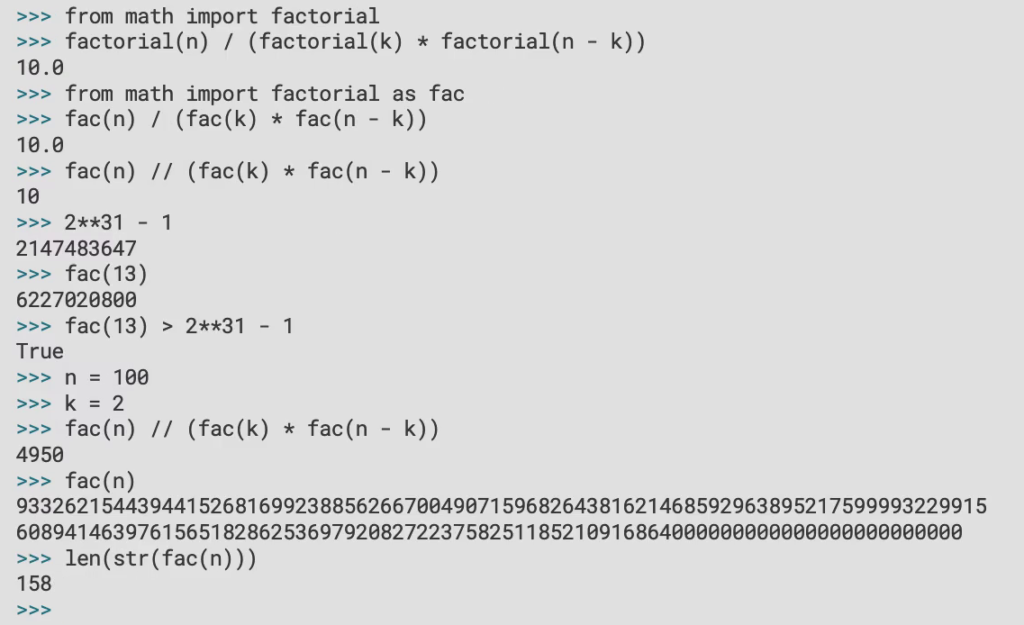
To see that, let’s use factorial to compute how many ways there are to draw three fruit from a set of five fruit using some math we learned in school. This simple expression is quite verbose with all those references to the math module. The Python import statement has an alternative form that allows us to bring a specific function from a module into the current namespace. This is a good improvement, but it’s still a little long winded for such a simple expression. A third form of the import statement allows us to rename the imported function. This can be useful for reasons of readability or to avoid a namespace clash. Useful as it is, we recommend that this feature be used infrequently and judiciously.
Remember that when we used factorial alone, it returned an integer, but our more complex expression for combinations is returning a floating point number. This is because we’ve used pythons floating point division operator, the single forward slash. We can improve our expression since we know it will only ever return integral results by using Python’s integer division operator, which is a double forward slash. What’s notable is that many other programming languages would fail on the above expression for even moderate values of n.
Remember that our simpler equation for combinations returns a floating point value, whereas factorial alone returns an integer. This is as a result of our use of the single forward slash floating point division operator in Python. Since we are confident that our expression will always provide integral values, we can enhance it by employing Python’s integer division operator, which is represented by a double forward slash. What’s noteworthy is that for even moderate values of n, many other programming languages would fail on the given formula.
Let’s try the larger problem of computing how many different pairs of fruit we can pick from 100 different fruits assuming we can lay our hands on so much fruit. Just to emphasise how large the size of the first term in that expression is, calculate 100 factorial on its own. This is a number vastly larger than even the number of atoms in the known universe with an awful lot of digits. If you’re curious to know exactly how many digits, we can convert our integer to a text string and count the number of characters in it like this.
Summary:
Congratulations! You’ve taken your first steps in Python, and you’re well on your way to reading and writing much more sophisticated Python programs. In this module, we saw how to download and install Python on Windows, Linux and macOS. We covered starting your Python REPL. We evaluated some simple expressions in the REPL. We learned that in the REPL, the underscore symbol is bound to the result of the last evaluated expression. We saw how to make basic use of the print function, and we learned that the printed output is a side effect of the function, not a return value. We saw how to exit the REPL using Ctrl+Z on Windows and Ctrl+D on Linux and macOS.

We were introduced to Python’s use of significant whitespace. We learned that code blocks in python are initiated with a colon and comprise consecutive lines at the same indentation level. We looked at some of the advantages of significant whitespace, including clarity and consistency. We covered the basic rules for indentation in Python. On a less technical level, we covered some parts of Python’s culture. We looked at the Zen of Python and saw that it could be printed by executing import this in the REPL, and we looked specifically at the idea that readability counts when writing Python code.

We went over the fundamentals of importing modules from the standard library and looked at three different import statement formats: importing a module in its entirety, importing only certain module elements, and renaming imported items. The help system for Python was demonstrated. Along the way, we learned how to use Python’s built-in math library’s factorial function. The core scalar types of Python, such as integers, floats, nones, and bools, as well as certain fundamental flow control methods, will be covered in the following module of Core Python: Getting Started.