In this article we are setting up the back-end(Express) for the MERN stack app, hope you also went through the previous post of this i.e setting up the front-end.
In this series of MERN stack tutorial we are have developed frontend, now it turn for backend
- Section 1: Setting Up the Project.
- Section 2: Setting up the backend.
- Section 3: Connection of Back-end to Front-end.
- Section 4: Finish the application.
This is the second article of the The MERN Stack Tutorial – Constructing A React CRUD Program From Start To Finish sequence. In the first section we’ve begun to integrate the front-end React application of the MERN stack todo application. In this second section, we’re going to concentrate on the back-end and create a server using Node.js / Express.
When constructing the back-end, we’ll also set up MongoDB and connect to the database from our Node.js / Express server using the Mongoose library.
The back-end would have HTTP endpoints for the following usage cases:
- Retrieve a full list of all available products by submitting an HTTP GET message.
- Retrieve a particular Todo item by submitting a message to HTTP GET and have a specific Todo ID in addition.
- Build a new all item in the database by submitting an HTTP POST message.
- Update a current all item in the database by submitting an HTTP POST message.
This Articles Contents
Initiating The Back-end for MERN stack app
Let’s build a new empty project folder to launch the back-end project:
PS D:\LearningNewTech\MERN-stack> mkdir MERN-backend


    Directory: D:\LearningNewTech\MERN-stack


Mode                LastWriteTime         Length Name
----                -------------         ------ ----
d-----       11/17/2020   2:44 PM                MERN-backend
Shift to the newly formed for MERN stack app folder by using:
cd .\MERN-backend\Create a package.json file within that folder using the following command:
PS D:\LearningNewTech\MERN-stack\MERN-backend> npm init -y
Wrote to D:\LearningNewTech\MERN-stack\MERN-backend\package.json:

{
  "name": "MERN-backend",
  "version": "1.0.0",
  "description": "",
  "main": "index.js",
  "scripts": {
    "test": "echo \"Error: no test specified\" && exit 1"
  },
  "keywords": [],
  "author": "",
  "license": "ISC"
}
With the package.json file available in the project folder, we are ready to add a range of dependencies to the project:
npm install express body-parser cors mongoose --savePS D:\LearningNewTech\MERN-stack\MERN-backend> npm install express body-parser cors mongoose --save
npm notice created a lockfile as package-lock.json. You should commit this file.
npm WARN MERN-backend@1.0.0 No description
npm WARN MERN-backend@1.0.0 No repository field.
+ cors@2.8.5
+ body-parser@1.19.0
+ express@4.17.1
+ mongoose@5.10.15
added 80 packages from 50 contributors and audited 80 packages in 3.892s
1 package is looking for funding
run `npm fund` for details
found 0 vulnerabilitiesTake a brief glance at the four packages:
- express: Express is a fast, lightweight web platform for Node.js. Express is a vital component of the MERN stack.
- body-parser: node.js middleware parsing body.
- cors: CORS is a node.js package to provide Express middleware that can be used to allow CORS with a number of options. Cross-origin resource sharing (CORS) is a process that enables restricted services on a web page to be requested by another domain outside the domain from which the first resource was used.
- mongoose: a framework in Node.js that helps one to use MongoDB in an object-oriented way.
Finally, we need to make sure that a global package is enabled by running the following command:
npm install -g nodemon --savePS D:\LearningNewTech\MERN-stack\MERN-backend> npm install -g nodemon --save
D:\Users\mingle\AppData\Roaming\npm\nodemon -> D:\Users\mingle\AppData\Roaming\npm\node_modules\nodemon\bin\nodemon.js
> nodemon@2.0.6 postinstall D:\Users\mingle\AppData\Roaming\npm\node_modules\nodemon
> node bin/postinstall || exit 0
npm WARN optional SKIPPING OPTIONAL DEPENDENCY: fsevents@~2.1.2 (node_modules\nodemon\node_modules\chokidar\node_modules\fsevents):
npm WARN notsup SKIPPING OPTIONAL DEPENDENCY: Unsupported platform for fsevents@2.1.3: wanted {"os":"darwin","arch":"any"} (current: {"os":"win32","arch":"x64"})
+ nodemon@2.0.6
updated 1 package in 3.709sNodemon is a utility that tracks any modifications to your source and automatically restarts your server. In the next steps, we will use nodemon while running our Node.js api.
Create a new file called server.js within the backend project folder and insert the following simple Node.js/Express server implementation for MERN stack app
const express = require('express');
const app = express();
const bodyParser = require('body-parser');
const cors = require('cors');
const PORT = 4000;

app.use(cors());
app.use(bodyParser.json());

app.listen(PORT, function() {
    console.log("MERN stack app is running on Port: " + PORT);
});
This code is used to build an Express server, connect cors and body-parser middle-ware, and make the server listen to port 4000.
Start the server by using nodemon:

As we can see that the server is operating on Port: 4000, we know that the server has been started successfully and is classified on Port 4000.
Installing MondoDB for MERN stack app
Now that we’ve managed to set up a simple Node.js/Express server, we’re able to begin with the next task: set up the MongoDB database.
First of all, we need to make sure MongoDB is installed on your machine. This role can be accomplished on MacOS by using the following command:
install mongodbIf you are running on Windows or Linux, follow the download instructions. click here
After you have installed MongoDB on your machine, you need to create a data directory that MongoDB uses:
mkdir /data/dbBefore running Mongod for the first time make sure that the user account running Mongod has read and write permissions for the directory.
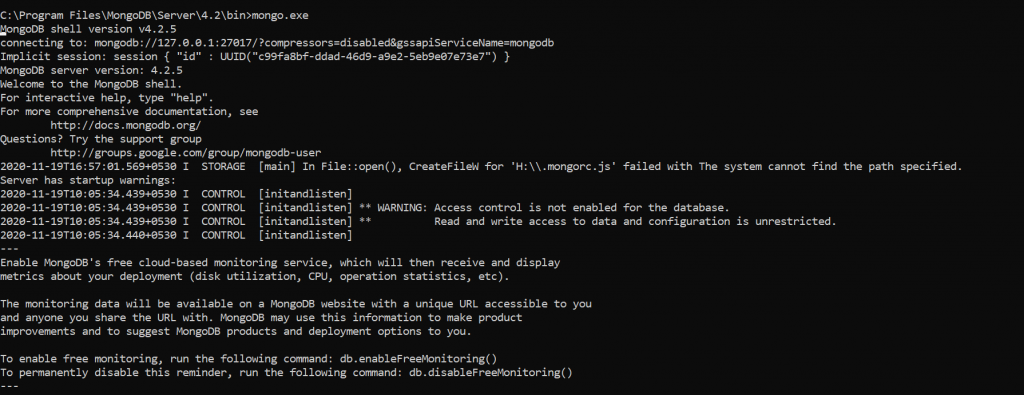
Now we’re ready to launch MongoDB by running the following command:
Creating A New MongoDB Database for MERN stack app
The next move is to construct an instance of the MongoDB database. Therefore, we connect to the database server using the MondoDB client on the command line:
mongo.exeIf the client is starting, you are asked to enter the database commands. Using the following order, we create a new database with the name “todos”:
use todosConnecting To MongoDB By Using Mongoose for MERN stack app
Let’s move back to Node.js/Express API implementation in server.js. With the MongoDB database service going, we are now able to connect to MongoDB from our server software using the Mongoose library. Adjust the server.js implementation to the following:
const express = require('express');
const app = express();
const bodyParser = require('body-parser');
const cors = require('cors');
const mongoose = require('mongoose');
const PORT = 4000;

app.use(cors());
app.use(bodyParser.json());

mongoose.connect('mongodb://127.0.0.1:27017/todos', { useNewUrlParser: true });
const connection = mongoose.connection;

connection.once('open', function() {
    console.log("MongoDB database connection established successfully");
})

app.listen(PORT, function() {
    console.log("MERN Stack app for onurdesk is running on Port: " + PORT);
});
Run the application by nodemon server

Create a Mongoose Schema for the MERN stack app
By using Mongoose, we can navigate the MongoDB database in an object-oriented manner. This means that we need to incorporate a Mongoose schema for our Todo object to our next project implementation.
Create a new file todo.model.js within the back-end project folder and paste the following lines of code to create the Todo schema:
const mongoose = require('mongoose');
const Schema = mongoose.Schema;

let Todo = new Schema({
    todo_description: {
        type: String
    },
    todo_responsible: {
        type: String
    },
    todo_priority: {
        type: String
    },
    todo_completed: {
        type: Boolean
    }
});

module.exports = mongoose.model('Todo', Todo);
With this code in place, we are now able to navigate the MongoDB database using the Todo table/schemas.
Implementing The Server Endpoints for MERN stack app
Let’s complete the application implementation in server.js in the last step by using the Todo schema we’ve just introduced to implement the endpoints of the API that we’d like to include.
To set the endpoints, we need to construct an instance of the Express Router by inserting the following code line:
const todoRoutes = express.Router();The router will be introduced as a middleware and will take care of the request starting with the/todos path:
app.use('/todos', todoRoutes);First of all, we need to add an endpoint that delivers all available items:
todoRoutes.route('/').get(function(req, res) {
    Todo.find(function(err, todos) {
        if (err) {
            console.log(err);
        } else {
            res.json(todos);
//Route for MERN stack app
        }
    });
});
The feature that is transferred to the get method call is used to manage the incoming HTTP GET request on the/todos/URL route. In this situation, we’re calling Todos. find to grab a list of all objects from the MongoDB database. Again the call of the find methods uses one argument: a callback function that is executed until the response is available. Here we make sure that the results (available in todos) are applied to the answer body in JSON format by calling res.json(todos).
The next endpoint for MERN stack app to be introduced is/:id. This route extension is used to retrieve an entire object by supplying an ID. The rationale of application is straight forward:
todoRoutes.route('/add').post(function(req, res) {
    let todo = new Todo(req.body);
    todo.save()
        .then(todo => {
            res.status(200).json({'todo': 'todo added successfully for MERN stack app'});
        })
        .catch(err => {
            res.status(400).send('adding new todo failed for MERN stack app');
        });
});
The new todo object is part of the HTTP POST request body meaning that we can access the req.body view and construct a new Todo case. This new object is saved to the database by calling the save feature.
Finally a HTTP POST route /update/:id is added for MERN stack app:
todoRoutes.route('/update/:id').post(function(req, res) {
    Todo.findById(req.params.id, function(err, todo) {
        if (!todo)
            res.status(404).send("data is not found in DB of MERN stack app ");
        else
            todo.todo_description = req.body.todo_description;
            todo.todo_responsible = req.body.todo_responsible;
            todo.todo_priority = req.body.todo_priority;
            todo.todo_completed = req.body.todo_completed;

            todo.save().then(todo => {
                res.json('Todo updated of MERN stack app!');
            })
            .catch(err => {
                res.status(400).send("Update not possible");
            });
    });
});
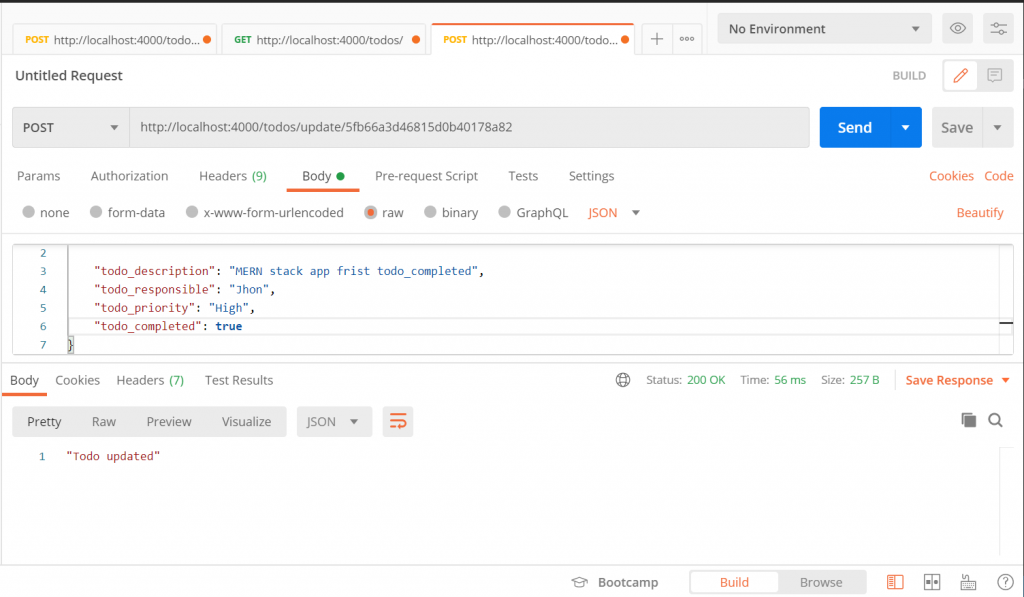
This path is used to update a current todo object (e.g. set the all completed property to true). Again this direction includes the parameter: id. Within the callback feature that is forwarded to the post call, we’re first downloading the old all item from the id-based database. Once the entire object is obtained, we set all property values to what is available in the request body. Finally, we need to call Todo.save to save the modified item to the database again.
Finally, you can see the full and final server.js code again for MERN stack app in the following:
const express = require('express');
const app = express();
const bodyParser = require('body-parser');
const cors = require('cors');
const mongoose = require('mongoose');
const todoRoutes = express.Router();
const PORT = 4000;

let Todo = require('./todo.model');

app.use(cors());
app.use(bodyParser.json());

mongoose.connect('mongodb://127.0.0.1:27017/todos', { useNewUrlParser: true });
const connection = mongoose.connection;

connection.once('open', function() {
    console.log("MongoDB database connection established successfully for MERN stack app");
})

todoRoutes.route('/').get(function(req, res) {
    Todo.find(function(err, todos) {
        if (err) {
            console.log(err);
        } else {
            res.json(todos);
        }
    });
});

todoRoutes.route('/:id').get(function(req, res) {
    let id = req.params.id;
    Todo.findById(id, function(err, todo) {
        res.json(todo);
    });
});

todoRoutes.route('/update/:id').post(function(req, res) {
    Todo.findById(req.params.id, function(err, todo) {
        if (!todo)
            res.status(404).send("data is not found");
        else
            todo.todo_description = req.body.todo_description;
            todo.todo_responsible = req.body.todo_responsible;
            todo.todo_priority = req.body.todo_priority;
            todo.todo_completed = req.body.todo_completed;

            todo.save().then(todo => {
                res.json('Todo updated!');
            })
            .catch(err => {
                res.status(400).send("Update not possible for MERN stack app");
            });
    });
});

todoRoutes.route('/add').post(function(req, res) {
    let todo = new Todo(req.body);
    todo.save()
        .then(todo => {
            res.status(200).json({'todo': 'todo added successfully for MERN stack app'});
        })
        .catch(err => {
            res.status(400).send('adding new todo failed for MERN stack app');
        });
});

app.use('/todos', todoRoutes);

app.listen(PORT, function() {
    console.log("Server is running for MERN stack app on Port: " + PORT);
});
Let’s run the MERN stack app with Postman
After finishing the server implementation, we are now able to run tests on our HTTP endpoints using the Postman tool.
1) First let’s add a first all item to our database by submitting an HTTP POST message.
Post API for MERN Stack app
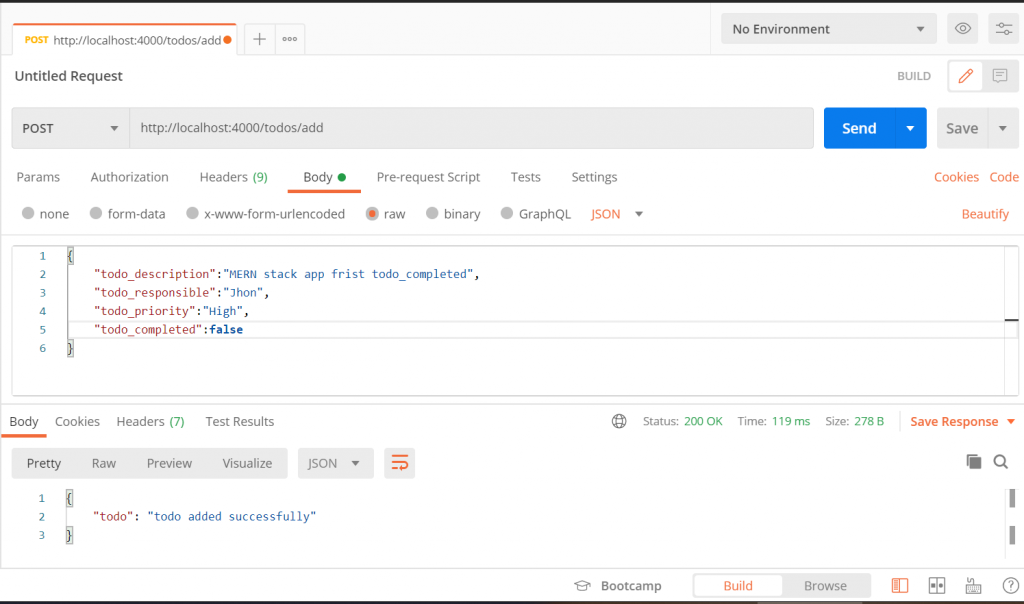
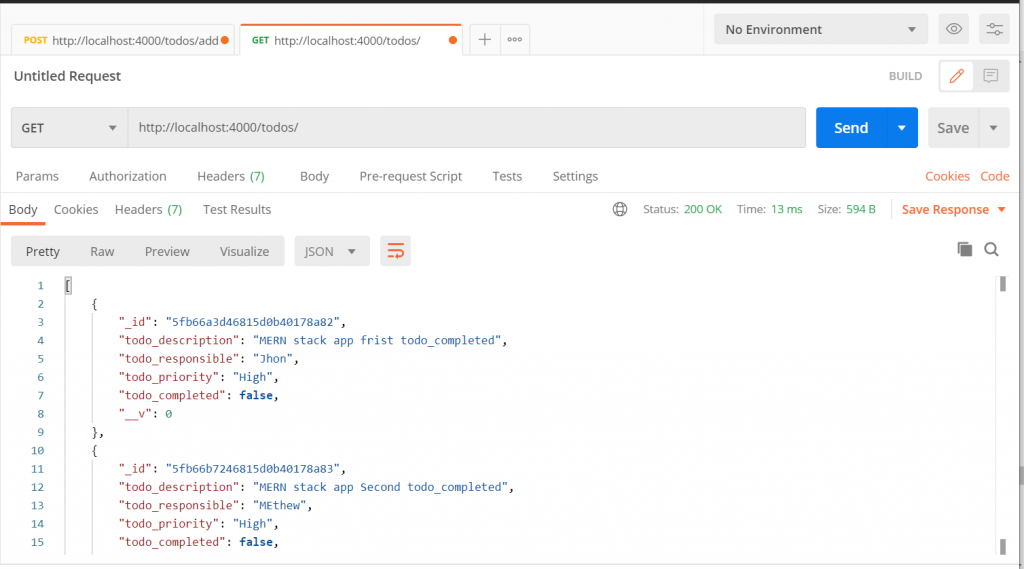
As a consequence, a JSON object containing the message is returned: all has been successfully added. Now that we have added the first entire thing to the database, we can retrieve the list of everything available by submitting the HTTP GET request to the/todos path:
Get All API for MERN stack app
Get a single resource by the id of the MERN stack app
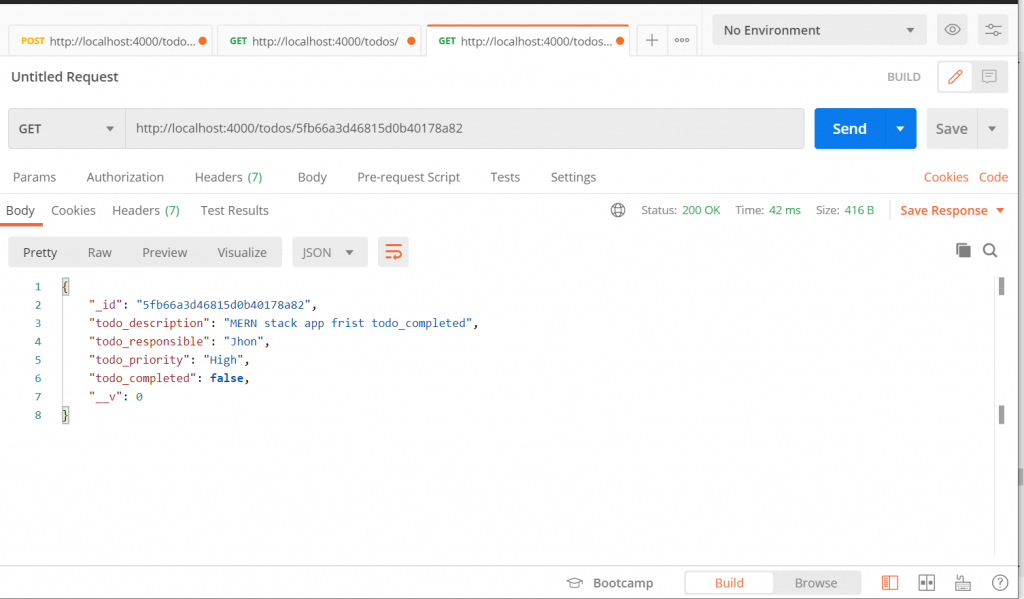
As anticipated, the same entire object is returned in JSON format as before. Next, let’s try to change the all completed property by submitting a POST request to the/update/:id path:
What’s Next in the MERN stack app
In the first part of this sequence, we began building the React front-end program for the MERN stack todo framework. In this second section, we started to develop a back-end server based on Node.js, Express, and MongoDB. We linked the Node.js/Express server to MongoDB using the Mongoose library.
We used Postman to make sure the server endpoints were operating as planned. In the next section, we will begin to complete the installation of the front-end response application and also link font-and back-end.