Authentication is one of the most critical aspects of almost any application, from a desktop app to a web app to a smartphone app. This guide is an In-depth Introduction to JWT (JSON Web Token) that allows you to know:
⦁ Token-based Authentication vs Session-based Authentication (Why JWT was born)
⦁ How JWT works internally
⦁ How to create a JWT for application.
⦁ How we can validate JWT and Secure our application
This Articles Contents
Token-based Authentication vs Session-based Authentication
To use every website, smartphone app or desktop app, you almost need to build an account, and use it to log in and access the app’s features. We call the action authentication.
So, how do I authenticate an account?
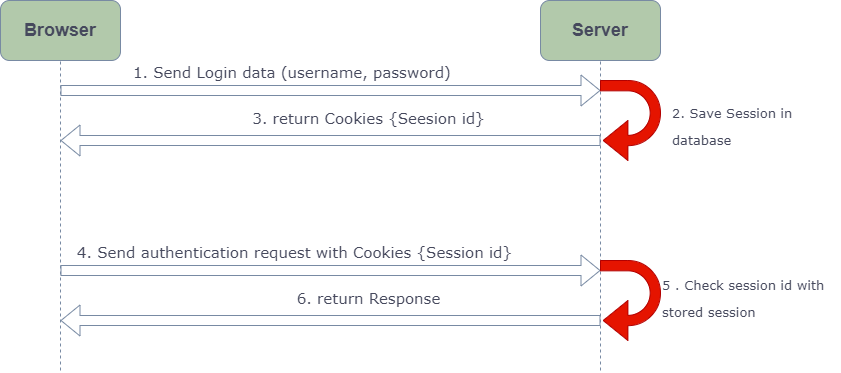
Next, let ‘s look at the basic approach used by common websites in the past: Session-based Authentication.
In the diagram above, when a user signs in to a website, the server will create a session for that user and store it (in memory or database). The server also returns a SessionId to the client to save it to the window cookie.

The Server Session has an expiry time. At that point, this Session has ended and the user must log in to build another Session.
If the user has signed in and the Session has not yet expired, the cookie (including SessionId) still covers all HTTP requests to the server. The server can match this SessionId with the saved Session to authenticate and return the corresponding Response.
Okay. So why do we need Token-based Authentication?
The answer is that we don’t just have a website, there are a lot of platforms out there.
Assume we have a website that works well for Session. One day, we want to implement the Smartphone (Native Apps) framework and use the same Database as the new Web client. What are we supposed to do? We can not authenticate users who use the Native App using Session-based Authentication since these kinds do not have cookies.
Will we create another backend project to support Native Apps?
Or why would we want to write an Authentication Framework for Native App users?
That’s why Token Authentication was born.
Using this method, the user login state is encoded by the server to the JSON Web Token (JWT) and forwarded to the device. Most RESTful APIs are now using it. Let’s head to the next segment, we’re going to see how it works.
JWT working
Now look at the flow below in diagram:

You can see that this is easy to grasp. Instead of building a session, the server generated a JWT from user login data and sent it to the client. The Client saves the JWT and from now on, any request from the Client should be added to the JWT (usually at the header). The server will validate the JWT and return the response.
It depends on the platform you use to store JWT on the client side:
⦁ Browser: Local Storage
⦁ IOS: Keychain
⦁ Android: SharedPreferences
This is a summary of the Token-based Authentication Flow. With the next section, you will grasp it more fully.
How to create a JWT
First of all, you should know three essential aspects of the JWT:
⦁ Header
⦁ Payload
⦁ Signature
Header
The Header answers the question: how are we going to generate the JWT?
Now, look at the header example, it’s a JSON object like this:{
"typ": "JWT",
"alg": "HS256"
}
-typ is ‘type,’ indicates that the type of token here is JWT.-alg stands for ‘algorithm,’ and is a Token Signature hash algorithm. In the code above, HS256 is HMAC-SHA256 – an algorithm that uses Secret Key
The Payload helps us to answer: What do we want to store in JWT?
Payload
This is a payload sample:{
"sub": "1234567890",
"userId": "MI78907890",
"userName" : "mayuringle",
"email" : "test@email.com",
"iss": "Learner for jwt",
"iat": 1516239022,
"exp":1516239022
}
In the JSON object above, we store three user fields: userId, username, email. You can save all of the fields you like.
We have some Standard Fields, too. They’re optional.
⦁ iss (Issuer): who issues that JWT token
⦁ iat (Issued at): At time the JWT was issued at
⦁ exp (Expiration Time): expiration time of JWT
Signature
This part is where we’re going to use the Hash Algorithm I told you above.
Look at the code below to get the signature:
HMACSHA256(
base64UrlEncode(header) + "." +
base64UrlEncode(payload),
your-256-bit-secret
)